Blender to UE5: The Complete Export Pipeline
You modeled something in Blender. You exported it. It’s 100× too big, the normals are wrong, and there are phantom bones called “hand_end” cluttering your skeleton. We’ve all been there.
The Blender-to-UE5 FBX pipeline works well once you know the exact settings — but the defaults fight you, and UE 5.4+ made things worse by replacing the legacy FBX importer with the Interchange Framework. This guide documents every critical setting for Blender’s FBX exporter and UE 5.6’s Interchange import dialog, covers static and skeletal mesh workflows, explains what transfers for materials, and walks through the most common import failures.
This guide targets Blender 4.x and Unreal Engine 5.6. Earlier UE5 versions use a different import dialog (the legacy FBX importer) — the Blender-side settings still apply but the UE5 import options will look different.
Prerequisites: Basic Blender and UE5 familiarity. We’ll be specific about where every setting lives.
Why scale breaks and how to fix it before you export
The single most common Blender-to-UE5 problem is scale mismatch. UE5 uses centimeters internally — 1 Unreal Unit equals 1 cm. Blender defaults to meters, where 1 Blender Unit equals 1 meter. That’s a 100× difference, and it causes objects to import at the wrong size, skeletons to scale incorrectly, and physics assets to report bones as “too small.”
Where to check in Blender: Properties panel → Scene Properties (the cone/film strip icon) → Units section. You’ll see Unit System (default: Metric) and Unit Scale (default: 1.0).
You have two approaches, and which one you choose depends on what you’re exporting.
Approach A — Keep Unit Scale at 1.0 (best for static meshes). Leave Blender’s defaults alone. Model at real-world meter scale — a door is about 2.0 BU tall. The FBX exporter writes unit-conversion metadata, and UE5 applies the 100× conversion automatically on import.
Approach B — Set Unit Scale to 0.01 (best for skeletal meshes). This makes 1 BU equal 1 centimeter, eliminating the unit conversion at export. This avoids a persistent class of bugs where the skeleton gets written with incorrect scale metadata. The trade-off: Blender’s viewport grid becomes tiny and some add-ons behave unexpectedly at non-1.0 unit scales.
How to tell you got it wrong: Your mesh appears in UE5 at the right visual size, but the Transform section in the Details panel shows Scale values of (100, 100, 100) instead of (1, 1, 1). It looks fine, but collision, sockets, physics, and animation will all break because the transform hierarchy is polluted.
Blender FBX export settings: every checkbox that matters
Open File → Export → FBX (.fbx) in Blender. The exporter writes FBX 7.4 binary format — there’s no version dropdown to worry about. Here’s every setting that affects your UE5 import, organized by panel.
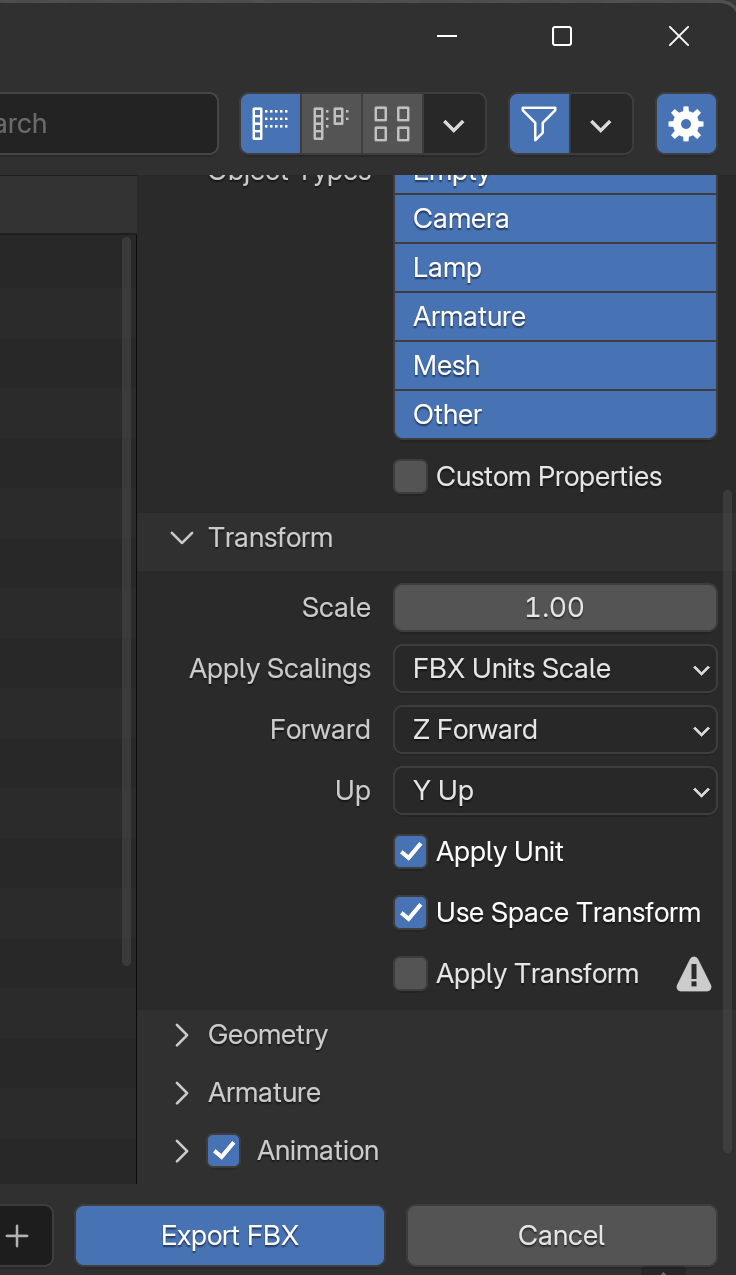
[SCREENSHOT: Blender’s FBX export dialog with the Transform panel expanded, showing the recommended settings. Caption: “Blender’s FBX export settings panel. Three settings here — Apply Scalings, Smoothing, and Add Leaf Bones — prevent about 80% of UE5 import headaches.”]
Transform panel
Scale: Leave at 1.0. Changing this directly scales all geometry and can break skeletons.
Apply Unit: Check this. It tells the exporter to factor in your scene’s Unit Scale when writing FBX metadata.
Apply Scalings: Set to FBX Units Scale. This is the most important dropdown in the entire dialog. It writes unit conversion to FBX metadata, letting UE5 handle the math. The default “All Local” also works for static meshes but can cause skeleton scale issues. Avoid “FBX All.”
Forward / Up: Leave at defaults: -Z Forward and Y Up. UE5 handles the coordinate conversion automatically.
Apply Transform: Leave unchecked for skeletal meshes — it’s labeled “EXPERIMENTAL” for a reason. It bakes the coordinate-system conversion directly into vertex data, which breaks armatures, skinning, and animations. For static meshes only, you can optionally enable it to get clean (0,0,0) rotation on import.
Include panel
Set Object Types to only what you need: check Mesh for static meshes, or Armature and Mesh for skeletal meshes. Uncheck Camera, Light, Empty, and Other unless you have a specific reason.
Check Selected Objects to export only your current selection rather than the entire scene.
Geometry panel
Smoothing: Set to Face. This prevents the “No smoothing group information was found” warning on import. Use “Normals Only” instead only if you need exact custom normals from a Data Transfer modifier — it triggers the warning but is technically more accurate.
Tangent Space: Check this. UE5 needs tangent and binormal vectors for correct normal map rendering.
Apply Modifiers: Check this. Applies all modifiers except Armature before export. Caveat: uncheck this if you need to preserve shape keys — you can’t have both applied modifiers and shape keys in the same FBX export.
Triangulate Faces: Leave unchecked. UE5 triangulates on import anyway.
Armature panel (skeletal meshes only)
Add Leaf Bones: Uncheck this. It’s enabled by default, and it’s the source of those phantom “hand_end,” “foot_end” bones that clutter your skeleton, break retargeting, and cause merge errors. You need to manually uncheck this on every single export unless you save a custom export preset (File → Export → FBX, set your settings, then click the + button next to the preset dropdown).
Primary Bone Axis / Secondary Bone Axis: Leave at defaults (Y / X). Blender bones align along local +Y while UE5’s Mannequin uses X-forward — this is cosmetic and doesn’t affect skinning or animation playback.
Only Deform Bones: Check this. It excludes IK controllers and helper bones that aren’t needed at runtime.
Animation panel
Bake Animation: Check for animated assets, uncheck for static meshes. Baking converts constraints, drivers, and IK into per-frame keyframes — required because UE5 can’t read Blender’s constraint systems.
Key All Bones: Check this. Forces at least one keyframe per bone, preventing UE5 from dropping “static” bones.
NLA Strips / All Actions: These control which animations export. “All Actions” exports every Action in the file as a separate take. “NLA Strips” exports each NLA strip as a take. To export a single specific animation, uncheck both and set the desired Action as active in the Action Editor.
Force Start/End Keying: Check this to prevent animation popping at clip boundaries.
Path Mode
Set to Copy and click the small box icon next to the dropdown to embed textures inside the FBX. This ensures texture files travel with the FBX rather than relying on file paths that break when you move things around.
Static mesh workflow: origins, collisions, and lightmap UVs
Apply transforms before export. Select your mesh, press Ctrl+A → All Transforms. This zeros out rotation and normalizes scale to (1,1,1). Unapplied transforms — especially non-uniform scale — cause distorted collision, broken normals, and physics bugs in UE5. Do this every time, for every mesh.
Set the origin point deliberately. Your object’s origin in Blender becomes its pivot point in UE5. For props, use Right-click → Set Origin → Origin to Geometry (centers the pivot) or Origin to 3D Cursor (for a floor-level pivot). For modular environment pieces, place the origin at a corner aligned to Blender’s world origin.
Custom collision meshes. UE5 recognizes collision meshes via strict naming prefixes. The collision mesh must be a separate object in Blender, exported in the same FBX:
- UCX_MeshName — Convex hull collision (most common). For multiple pieces: UCX_MeshName_00, UCX_MeshName_01, etc.
- UBX_MeshName — Box collision.
- USP_MeshName — Sphere collision.
- UCP_MeshName — Capsule collision.
The MeshName portion must exactly match the render mesh’s object name (case-sensitive). In UE 5.6’s Interchange dialog, expand Assets → Collision and check Import Collisions. If collision still isn’t recognized, try parenting UCX objects to the render mesh in Blender’s outliner (Ctrl+P → Object) before export — Interchange may require this hierarchy.
Lightmap UVs. UE5 needs a non-overlapping UV layout in UV Channel 1 for baked lightmaps. Your options: create a second UV map in Blender using U → Lightmap Pack; let UE5 auto-generate them post-import in the Static Mesh’s Build Settings; or skip them entirely if you’re using Lumen (UE5’s default dynamic GI), which doesn’t need lightmap UVs at all.
Skeletal mesh workflow: root bones, orientation, and animation
The root bone requirement. UE5 requires a single root bone at the top of your skeleton hierarchy. A subtle trap: rename your armature object away from Blender’s default “Armature.” UE5 can confuse the armature node with an actual bone, interpreting it as a second root.
Exporting animations — separate files (recommended). Export one FBX with armature + mesh (animation unchecked) for the skeletal mesh. Export additional FBXs per animation containing only the armature with Bake Animation enabled and both NLA Strips and All Actions unchecked. In UE5, import the mesh first, then import each animation FBX and assign it the existing Skeleton.
All-in-one FBX. Check “All Actions” to export every Action as a separate animation take. Simpler but produces larger files.
Root motion. Animate the root bone’s translation (not the armature object’s location). In UE5, enable Root Motion on the Animation Asset or Animation Blueprint.
What transfers for materials (and what doesn’t)
Blender’s FBX exporter reads only from the Principled BSDF node. The values that actually transfer: Base Color (value and connected Image Texture), Roughness (value and texture), Metallic (value and texture), Specular Intensity, Alpha (value and texture), Normal Map (only through a Normal Map node), IOR, and Transmission.
What doesn’t transfer: procedural textures (Noise, Voronoi, etc.), node math (Color Ramp, Math, Mix Shader), Emission, Subsurface Scattering, Clearcoat, and Bump nodes. A subtle gotcha: if a Roughness or Metallic value comes from a separate Value node rather than being set directly on the Principled BSDF’s own field, it often exports as a default value (frequently 1.0). Plug values directly into the shader fields.
The recommended production workflow: Use Principled BSDF with descriptive material names. For simple materials, let UE5 auto-import as a starting point. For anything complex or procedural, bake to image textures in Blender (Cycles baking), export textures as PNG/TGA, and build materials from scratch in UE5 using Material Instances.
UE5 import: what the Interchange dialog actually shows you
UE 5.6 uses the Interchange Framework as its FBX importer. If you’ve seen older tutorials referencing “Convert Scene Unit,” “Normal Import Method,” or “Auto Generate Collision” in a detailed import dialog — those are from the legacy FBX importer that was the default before UE 5.4. The Interchange dialog is much simpler.
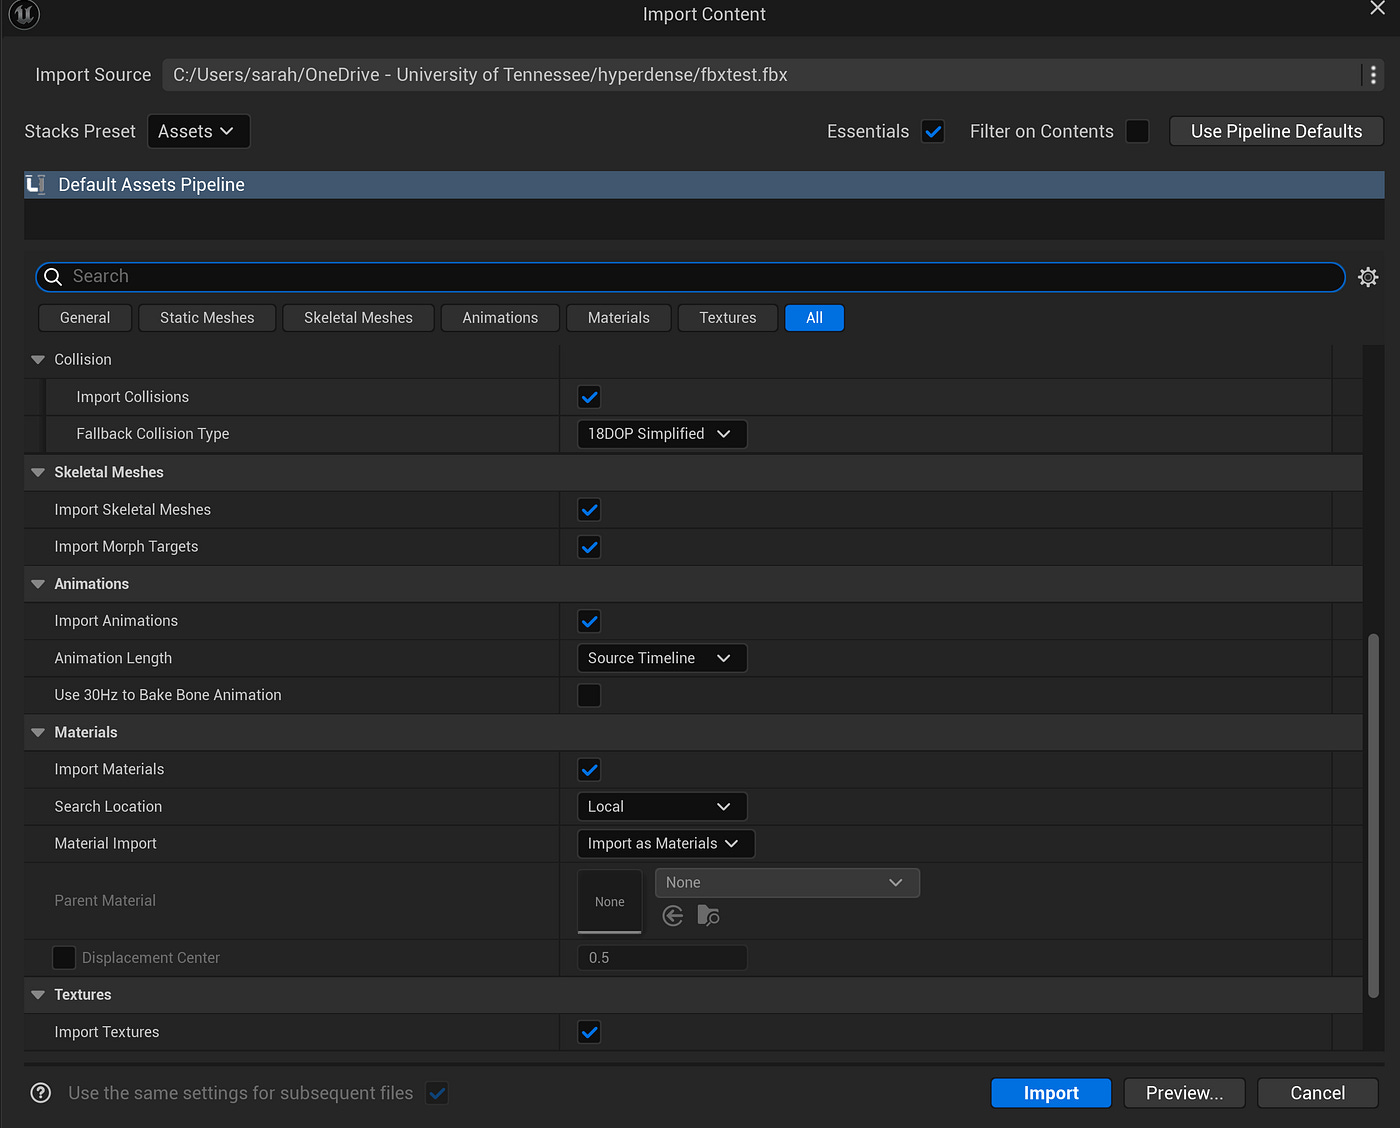
[SCREENSHOT: UE 5.6 Interchange FBX import dialog showing Assets, Materials, and Textures sections. Caption: “UE 5.6’s Interchange import dialog. If you’re looking for Normal Import Method or Convert Scene Unit from older tutorials — they’re not here anymore.”]
When you drag an FBX into the Content Browser, here’s what you see:
Top of the dialog: A Use Pipeline Defaults button and a Preview button.
Assets section: Contains Offset Uniform Scale (leave at 1.0 unless your scale is wrong) and a Collision subsection with an Import Collisions checkbox and Fallback Collision Type dropdown.
Materials section: Contains Material Search Location, which controls how UE5 matches FBX materials to existing materials in your project.
Textures section: Contains an Import Textures checkbox.
That’s it.
What’s missing (and why it matters). Normal Import Method, Build Nanite, Generate Lightmap UVs, and Import Mesh LODs are all absent — handled silently by pipeline defaults. The critical one is normals: in UE 5.4/5.5, Interchange defaulted to recomputing normals, silently destroying authored shading. Whether 5.6 fixed this is version-dependent. If your mesh has shading artifacts after import that weren’t there in Blender, recomputed normals are the likely culprit.
To change hidden defaults, try editing the pipeline asset directly: enable Show Engine Content in the Content Browser settings, then search for the Interchange pipeline assets. Alternatively, fix normals post-import in the Static Mesh’s Build Settings.
The 10 most common import problems and how to fix them
1. Mesh is 100× too big or too small. Verify Apply Unit is checked and Apply Scalings is set to FBX Units Scale. If scale is still wrong, adjust Offset Uniform Scale in the import dialog. For skeletal meshes, try Blender’s Unit Scale at 0.01.
2. “No smoothing group information” warning. Set Smoothing to Face instead of Normals Only in the FBX Geometry panel.
3. Broken normals and shading artifacts. Likely Interchange recomputing your normals. Export with Smoothing set to Face, Tangent Space checked. If it persists, edit pipeline defaults or fix post-import in Build Settings. Verify normals behavior in your specific 5.6 build.
4. Mesh appearing inside-out. In Edit Mode, select all (A), then Mesh → Normals → Recalculate Outside (Shift+N). Check for negative scale values and apply them (Ctrl+A → Scale). Use the Face Orientation overlay to diagnose before export.
5. Pivot point in the wrong place. Set the object’s origin deliberately before export via Right-click → Set Origin.
6. Collision meshes not recognized. Verify naming exactly matches UCX_[RenderMeshName] (case-sensitive). Check Import Collisions in the dialog. Try parenting UCX objects to the render mesh before export.
7. Extra leaf bones in skeleton. Uncheck Add Leaf Bones in the FBX Armature panel. Enabled by default — save a preset.
8. Animations not playing or scaled wrong. Animate the root bone (not the armature object) for root motion. Verify Bake Animation and Key All Bones are checked. Apply all transforms on the armature.
9. Duplicate or broken materials. Remove unused material slots, give each material a unique name. For production, build materials in UE5 instead.
10. Wrong animation exported. Uncheck both NLA Strips and All Actions. Select only the desired Action in the Action Editor. Set the frame range to match.
Quick reference cheat sheet
If you remember nothing else from this guide:
Blender FBX export (static meshes):
- Apply Scalings: FBX Units Scale
- Smoothing: Face
- Apply Modifiers: on
- Selected Objects: on
Blender FBX export (skeletal meshes):
- Apply Scalings: FBX Units Scale
- Apply Transform: off
- Add Leaf Bones: off (uncheck this!)
- Only Deform Bones: on
- Bake Animation: on (for animated assets)
- Key All Bones: on
UE 5.6 Interchange import dialog:
- Offset Uniform Scale: 1.0 (don’t touch unless scale is wrong)
- Import Collisions: on (under Assets → Collision)
- Import Textures: on
Before every export from Blender: apply all transforms (Ctrl+A → All Transforms), set origin to desired pivot point, clean up unused material slots, and verify face orientation (enable the overlay — look for red faces).
Save your export settings as a preset. The defaults fight you — especially Add Leaf Bones and Apply Scalings — and reconfiguring them every export is how mistakes happen.
Next steps
Once your assets are importing cleanly, you’ll probably want to look into automating the pipeline. Epic’s Send to Unreal addon (community-maintained) lets you push assets from Blender to a running UE5 editor with one click, skipping the manual export/import cycle entirely. For skeletal meshes specifically, Auto-Rig Pro (~$40 on Blender Market) has a UE5 preset that handles bone orientation and scale issues automatically.
If something in this guide didn’t match your setup, or if UE 5.6 has changed behavior since we wrote this — reply to this post or drop us a message. The Interchange Framework is still evolving, and we’ll update this guide as Epic stabilizes the pipeline. The Blender-side settings here are battle-tested, and getting those right solves about 80% of import problems before you ever open UE5.